
How to start a blog and find your first readers (part 3)
Archive Notice
This article was originally published on my former blog, DawsonDecoded, and is preserved here for historical reference. It reflects my views and approach at the time it was written. Any affiliate links that originally appeared in this article have been removed or disabled.
Make it look and feel professional
Themes and must‑have pages
In Part 2 of this series, we took your idea live by choosing a host, installing WordPress, and configuring the basics. If you missed it, read Part 2: from idea to website.
In this part you will:
- Choose and install a theme that is easy to customize (I recommend Kadence).
- Set your basic branding (colors, fonts, logo, favicon).
- Configure essential site settings that affect usability and SEO.
- Publish the must‑have pages for trust and compliance.
- Launch a clean first version of your blog, and start writing.
When I designed my first website, like most beginners, I spent weeks tweaking pixels. You won’t have to. The goal here is a professional, fast site you can publish in one afternoon, so you can move on to writing and promoting your posts.
In short, you’ll pick a simple, beginner-friendly WordPress theme. And alongside your homepage and blog, you will publish three core pages: About, Contact, and a Privacy Policy that includes your affiliate disclosure.
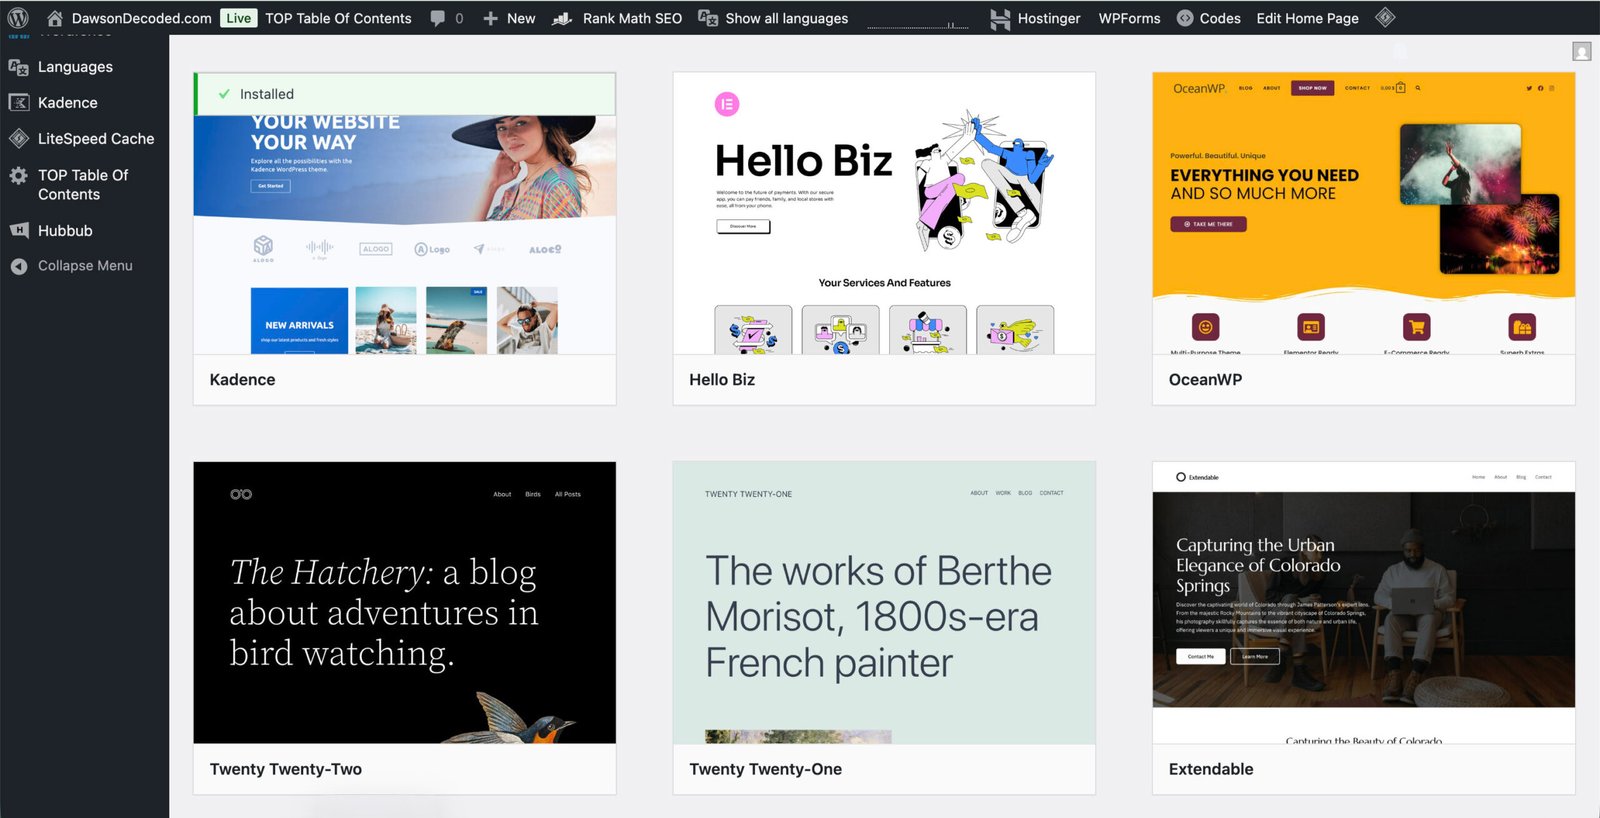
Some of the free themes available in the WordPress dashboard (in Appearance → Themes → Add New, or Add Theme).
Choose the right foundation: where to start
In the previous post, we installed WordPress from Hostinger’s hPanel. Now we need the framework for your content. WordPress includes a large library of free themes and reusable patterns you can start from, then customise to fit your needs.
Create your WordPress site on Hostinger
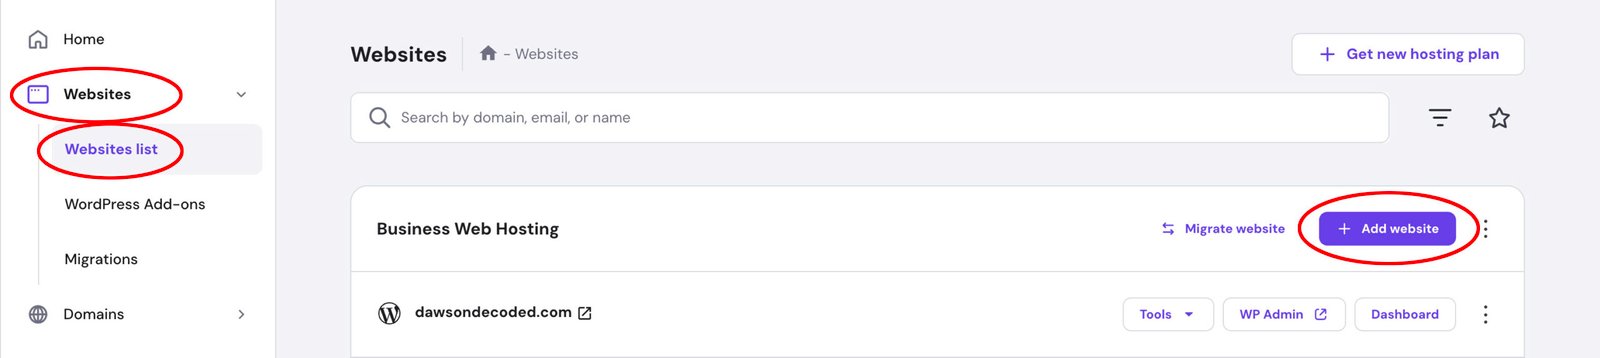
- In hPanel, go to Websites → Websites List → and click on “+ Add Website”.
- Choose WordPress.
- Enter your admin email and a strong password, then continue.
- When asked how you’d like to build your website, select “Pre-built websites and themes”.
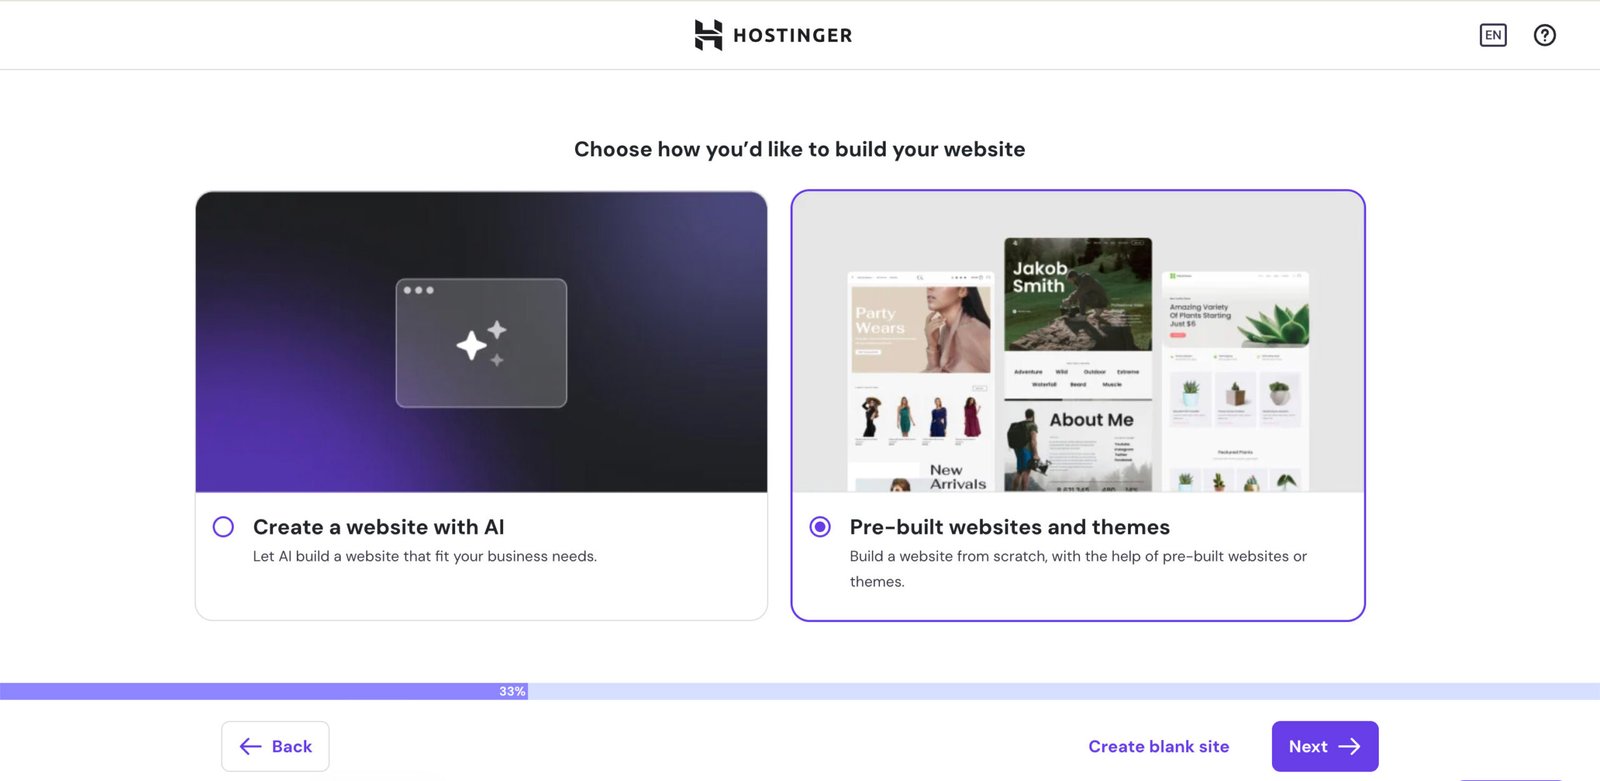
Note: Hostinger can scaffold your site with AI and demo content. But here, we want to keep full control while we cover themes and templates.
- Click Next. You’ll see a gallery of pre-built website templates.
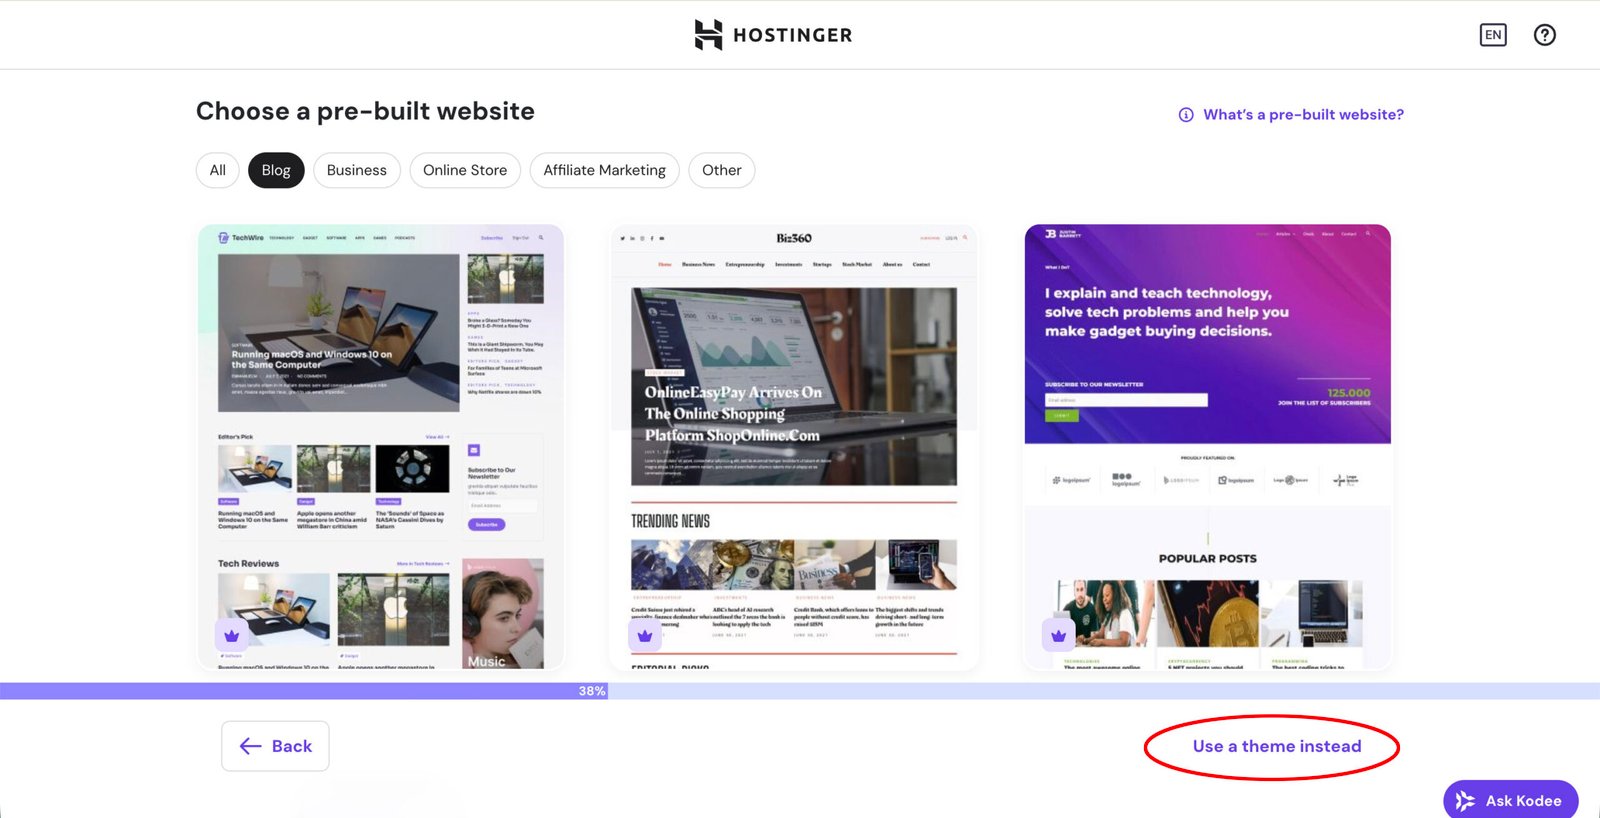
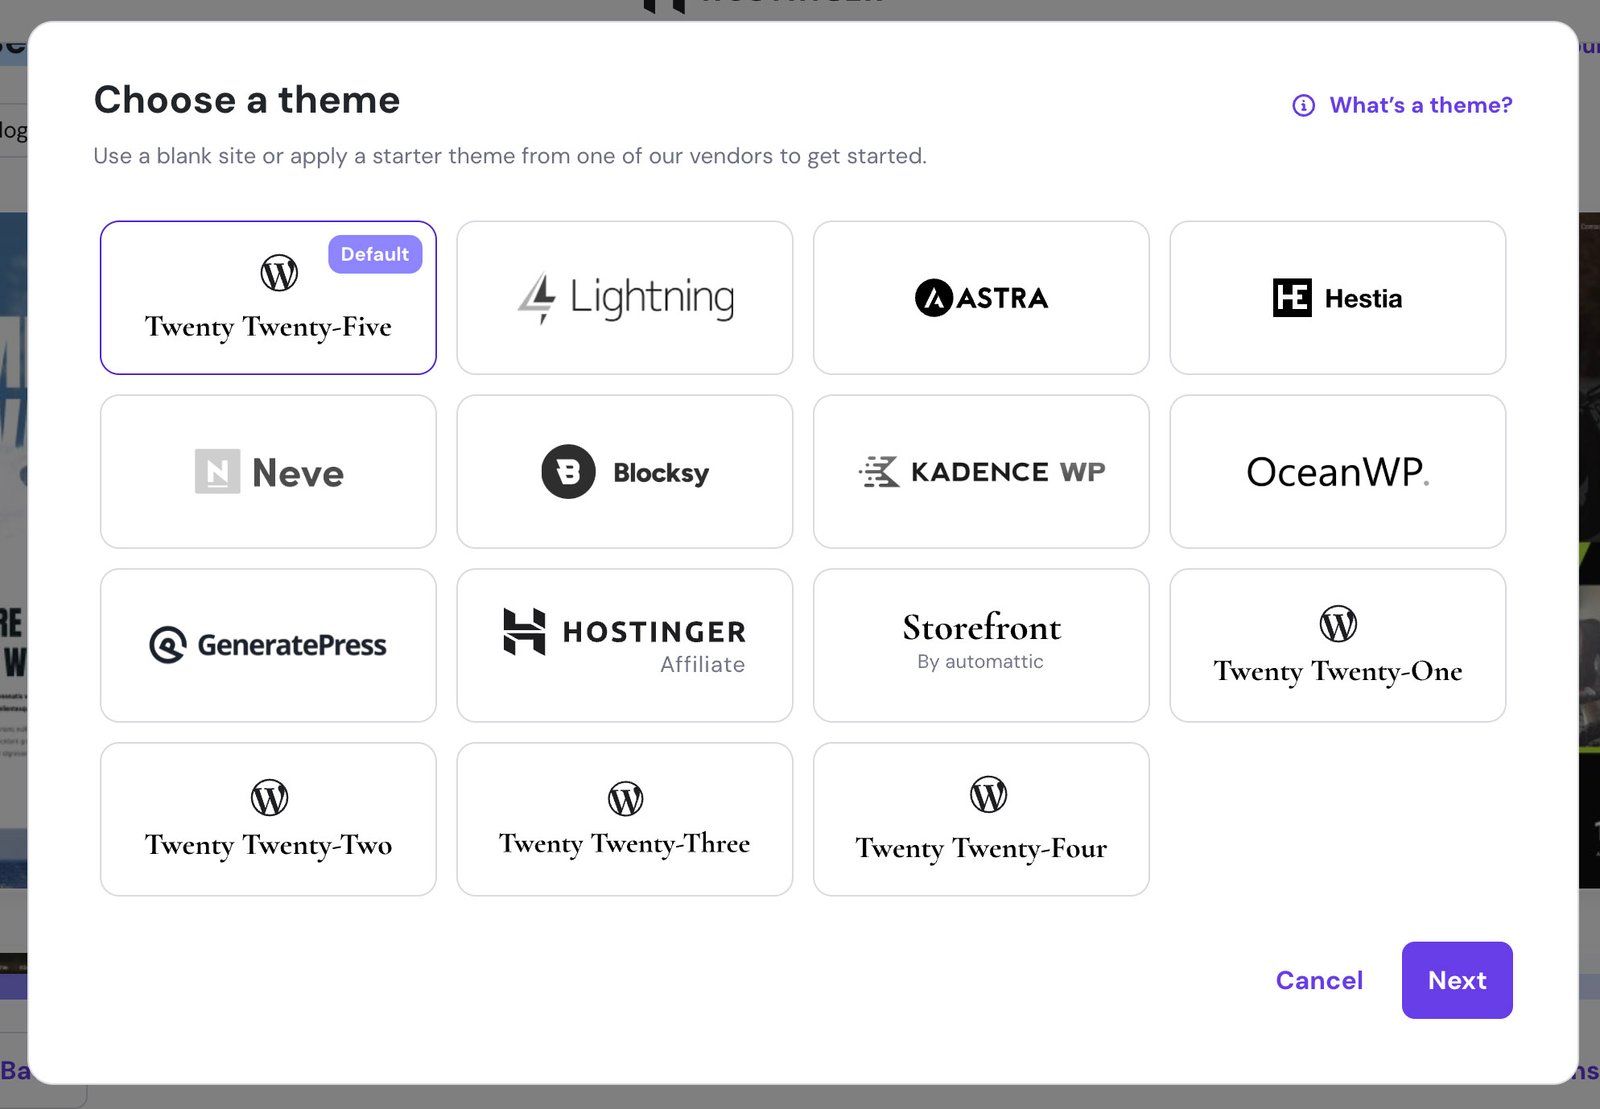
We want a theme, not a pre-built website. At the bottom of the screen, click “Use a theme instead”. You’ll then be asked to choose from a list of themes:
Why a theme and not a pre‑built site
A pre-built site typically pulls in full-page designs, demo content (pages and posts), menus, and often several helper plugins from that vendor. It may also impose its own settings. All of that can make switching or simplifying harder later.
With a theme, you start light and add only what you need. You set global styles once, then reuse patterns for sections like hero, FAQ, CTA, and footer, so your design stays consistent.
A pre‑built site can make sense if you’re building a small brochure site that will rarely change. It is also tempting to start from a layout you like and customise it, which is what I did with DawsonDecoded. But for most beginners, starting with a theme is the better approach.
Which theme to chose?
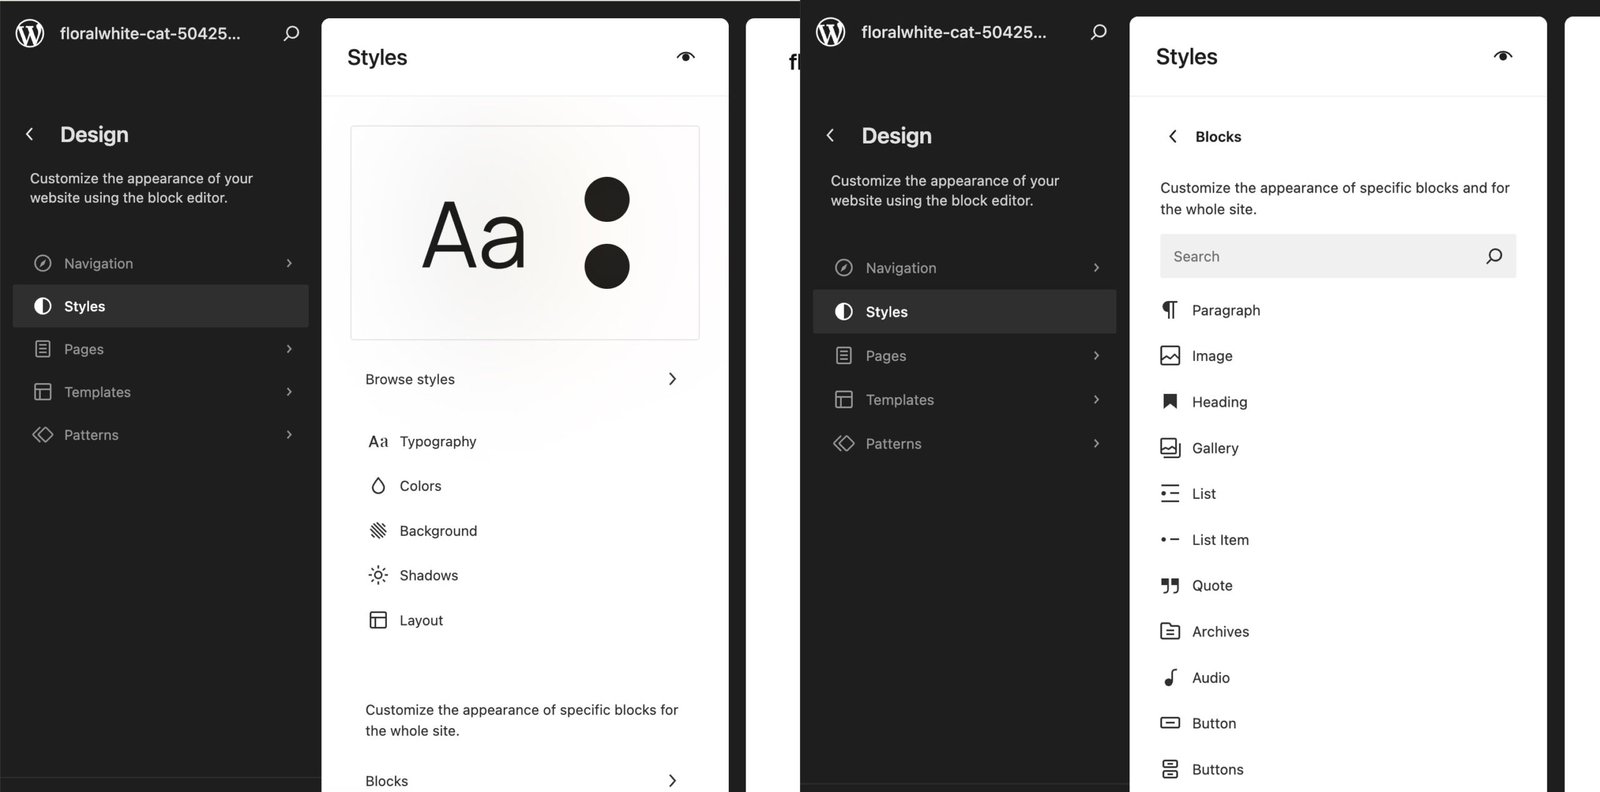
Block themes (like Twenty Twenty‑Five), use the Site Editor and patterns for almost everything.
Optimized themes with block support (like Kadence or Astra), keep a friendly Customizer panel with clear settings for typography, colours, header and footer, while still working well with the block editor.
If you are a beginner, optimised themes often feel more structured and easier to grasp.
Here’s a popularity snapshot (installs per theme as of Oct. 2025):
- Twenty Twenty-Five: 1+ million (default theme).
- Astra: 1+ million
- GeneratePress: 500,000+
- OceanWP: 500,000+
- Kadence: 400,000+
- Blocksy: 200,000+
- Neve: 200,000+
You cannot go wrong with any of these. For this site, I use the free version of Kadence.
How to choose in 30 seconds:
- Pure block editing and OK with a learning curve → Twenty Twenty-Five
- Maximum compatibility and huge ecosystem → Astra
- Blog + flexible layout controls → Kadence
- Performance and minimalism → GeneratePress
- Modern controls + rich patterns → Blocksy
- Straightforward, no-fuss setup → Neve
- Ecommerce from day one → Storefront (WooCommerce’s reference theme, only if your site is primarily a shop from day one).
For bilingual sites like this one (with Polylang), Kadence, Astra, GeneratePress, Blocksy and Neve all work well.
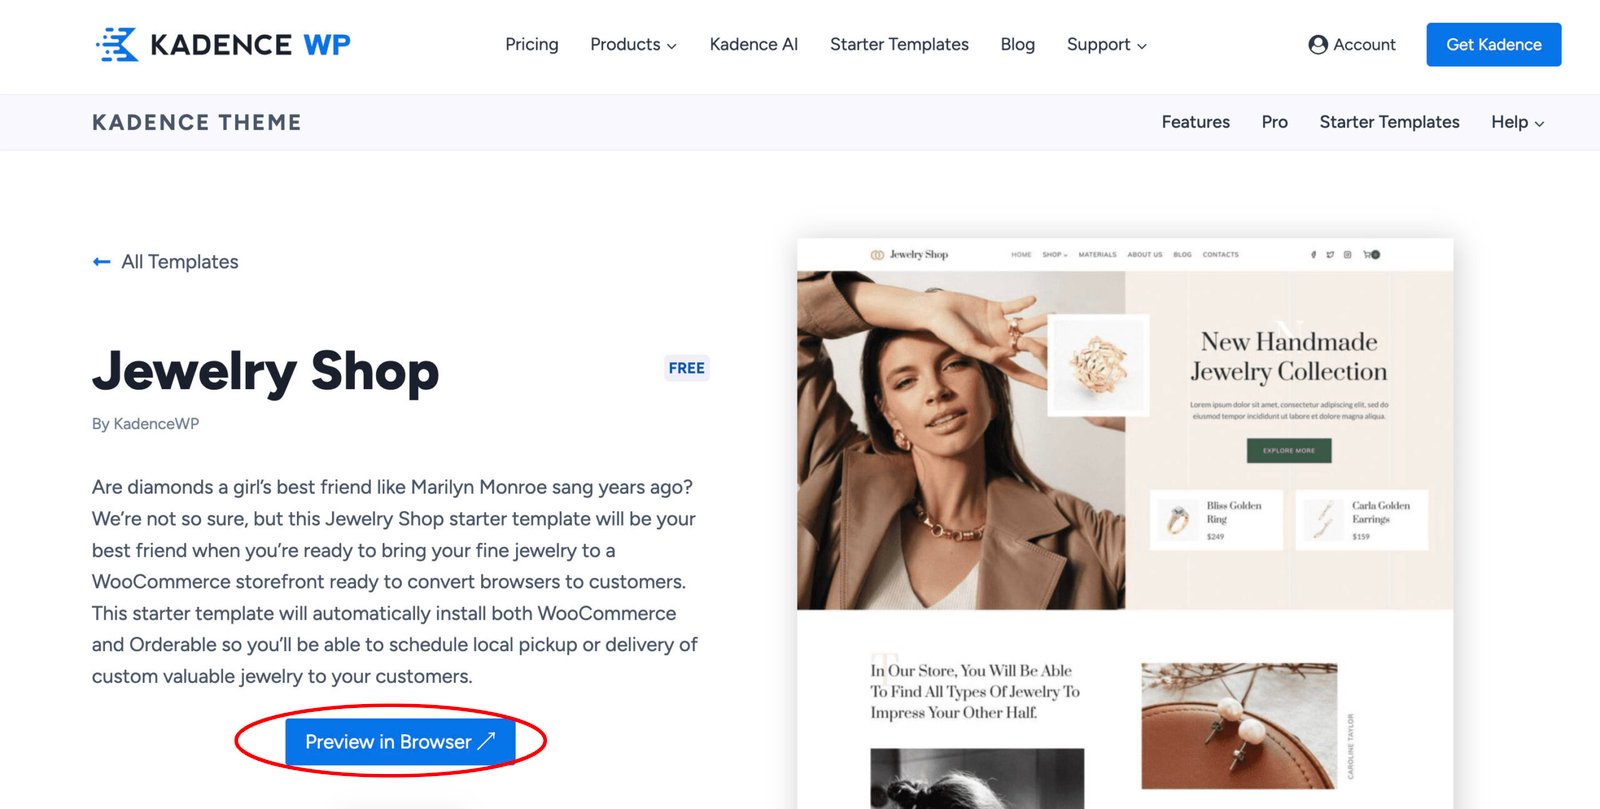
The Jewelry Shop template in the Kadence Starter Templates library. Each template has a live preview, so you can quickly assess whether the look, layout, and navigation fit your site.
This website (DawsonDecoded) is built using the Kadence theme. Kadence gave me an complete framework, even on the free tier, whereas page builders like Elementor felt too limited. While exploring Kadence’s Starter Templates, the Jewelry Shop layout matched the look I wanted: clear primary menus with logo on the left, a tidy blog layout, and an e-commerce header with a cart, which I needed for selling eBooks. I imported the demo, customized the styles to my taste, then removed the parts I did not need.
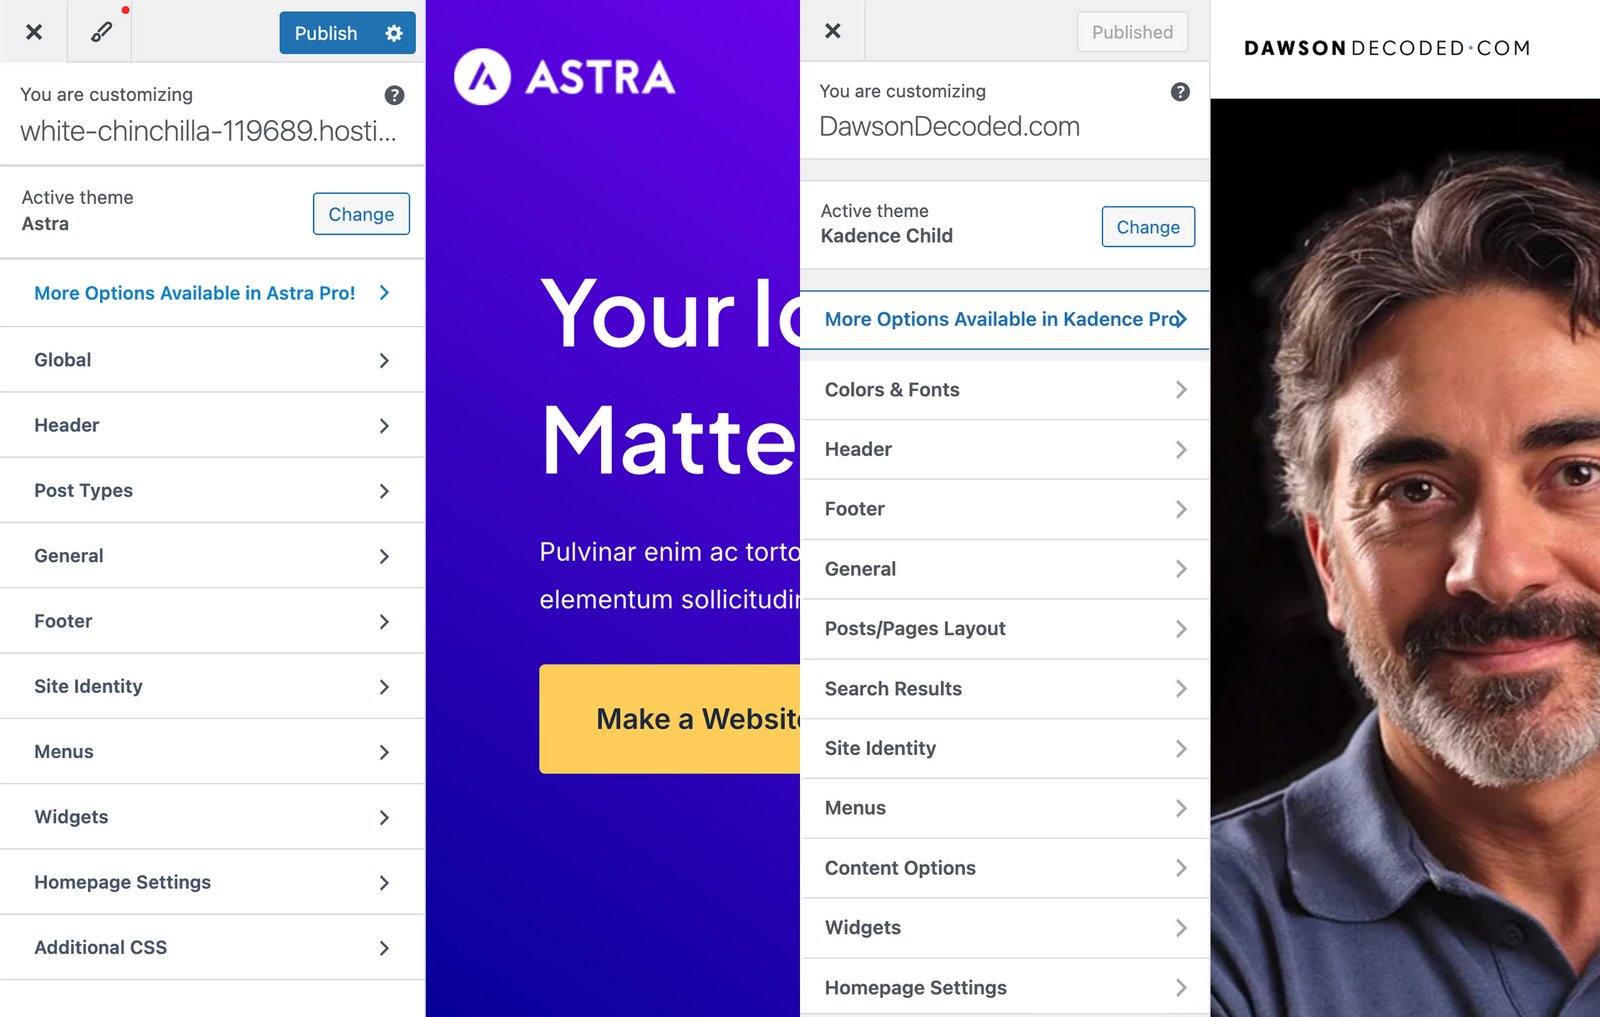
Above for comparison: side-by-side screenshots of Astra and Kadence Customizer panels, and below, a Twenty Twenty-Five Site Editor view showing the Styles panel and block settings.
Recommended starter themes for beginners
Kadence and Astra are safe, fast starting points. If you want guardrails and a professional look, pick one of these. Both are free, with optional pro add-ons.
- You’ll likely see a “Recommended plugins” step during the Hostinger setup. Skip it for now to keep things lean. You can add plugins later from the WordPress dashboard.
- Domain step:
Enter your domain name. Hostinger will assign it to your site. If you don’t have one yet, choose “Use temporary domain” at the bottom of the screen. You can switch to your real domain later from hPanel without rebuilding the site.
This is where you apply the name you chose in Part 1 (for example, “myblogname.com”).
Define your blog’s visual identity
For week one, keep it simple:
- Colours: pick one primary colour (buttons, links, highlights) and one secondary. Pair with a near-white background and a dark text colour for contrast.
- Typography: use one clean sans-serif for body (Inter, Sora, Roboto, Source Sans 3) and optionally one serif for headings (Playfair, Lora, Merriweather).
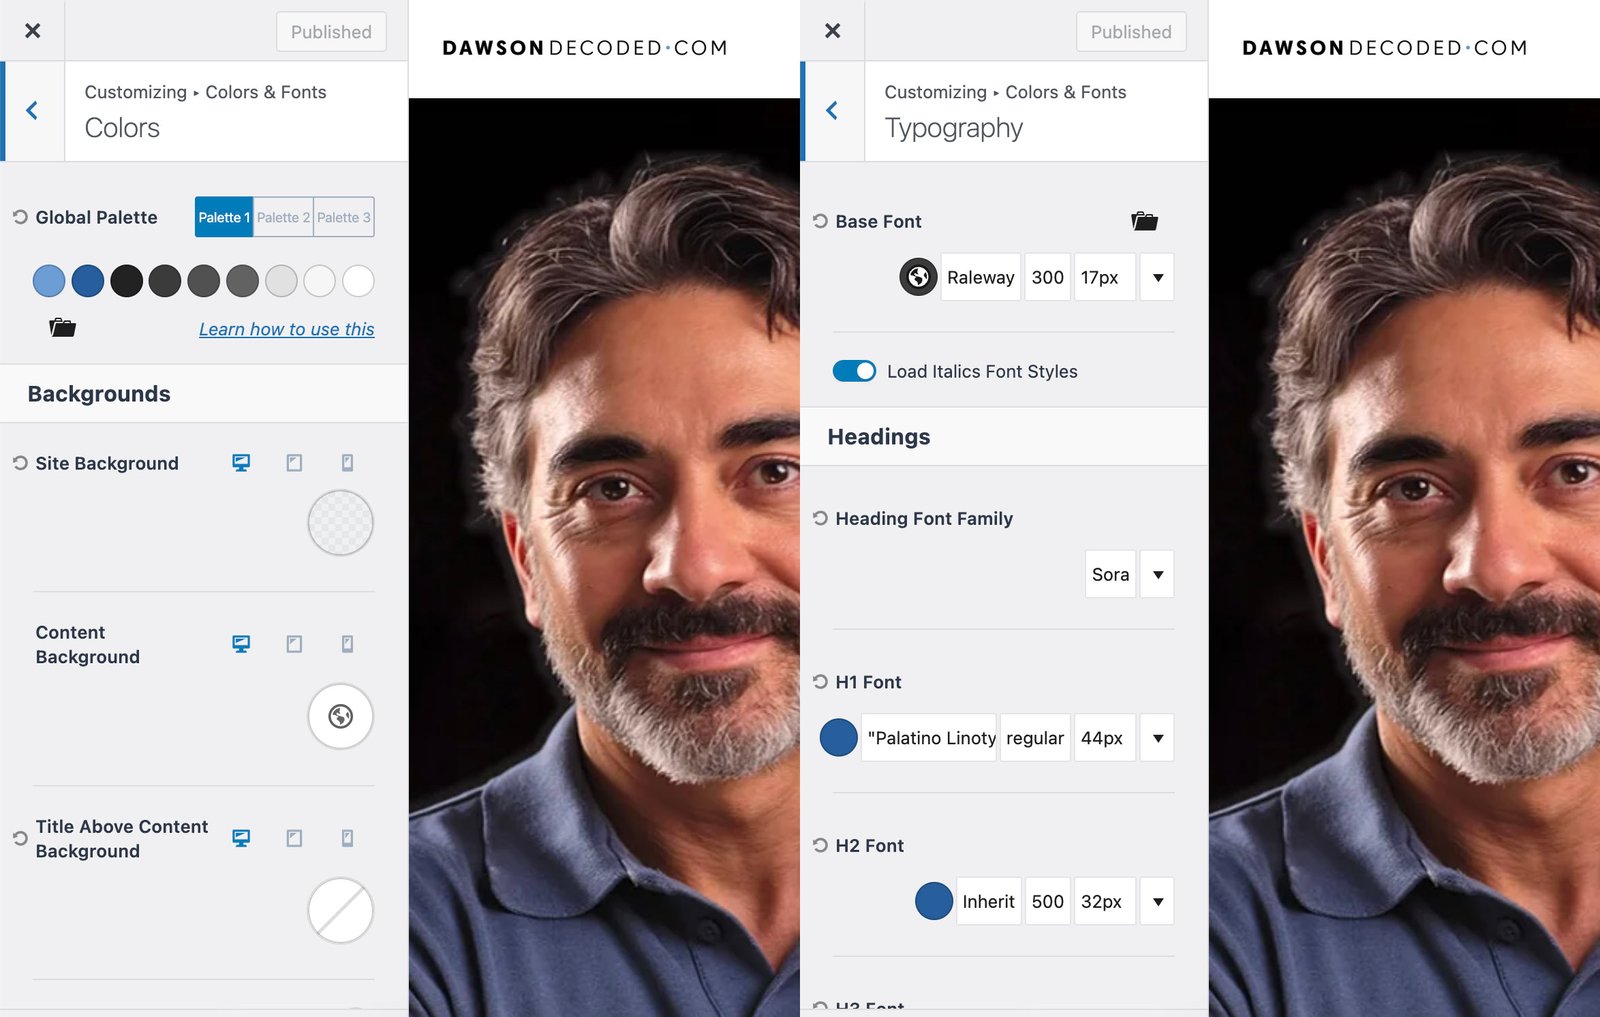
Kadence global settings for colours and typography. For DawsonDecoded, my primary colour is a dark blue, complemented by a lighter tint and by tones of grey. I also use a very light grey as the background. For fonts, I use Palatino for H1, Sora for H2, and Raleway for body.
Tighten the layout
- Header: show a clean logo and one primary menu. Skip secondary menus for now.
- Body text: 16–18 px size, 1.5–1.7 line height, and a readable content width (about 65–75 characters per line).
- Headings: use clear hierarchy and sensible scaling so H1 > H2 > H3 is obvious.
- Contrast: ensure strong colour contrast between text and background. If text sits on images, add an overlay.
- Buttons & links: one primary button style and one link colour across the site, no one-offs.
- Spacing: keep generous vertical spacing between sections to create breathing room and improve legibility.
- Mobile check: open the site on your phone and test menus, forms, and readability from top to bottom.
Logo and favicon
Create and import your logo and a favicon: this can be a straightforward wordmark (text-only logo) in Canva or Figma, or a properly designed symbol (see Part 1 of this series for tools to help you design it, or check the Brand Names, Logos & Symbols toolbox page on this site).
- With Kadence: Appearance → Customize → Site Identity → upload Logo and Site Icon.
- Use a 512×512 px PNG for the site icon. For the logo, upload a sufficiently large PNG (transparent background), then control its displayed size in the Customizer.
If you’re using another theme such as Twenty Twenty-Five or Astra, the UI may look slightly different, but the core steps are the same.
Publish the must‑have pages
These pages make your site feel complete and cover basic trust and legal needs.
Start with:
- About: who you are, what the blog covers, who it helps. Add a link to a “Start here” path or your first posts.
- Contact: either a simple form or a dedicated inbox like hello@yourblog.com. If your theme’s block plugin includes a Form block (for example, Kadence Blocks), use that. Otherwise install a light forms plugin (WPForms Lite or Fluent Forms Lite).
- Privacy Policy: in WordPress go to Settings → Privacy and generate the starter policy.
- Affiliate Disclosure: a short, plain-English disclosure page plus a one-line disclosure near any post that contains affiliate links.
Add after:
- A “Start Here” section on the Home page, highlighting your best content.
- A Resources/Tools page listing software you actually use (a natural home for affiliates).
- Terms and Conditions/Refund Policy, if you plan to sell. WooCommerce can create starter pages you then customise.
Optional compliance notes:
- If you have visitors in the EU/UK or California and you use tracking, add a cookie/consent banner later (Complianz or CookieYes are popular light options).
- Put links to Privacy and Disclosure in your footer menu so they are always visible.
Where to create these pages:
- In Kadence: Pages → Add New, publish, then add them to your menus in Appearance → Menus.
Study a few favourite blogs, note what you like, and use this as a foundation, then build your own version.
Configure the essential site settings
Five minutes here saves hours later.
WordPress basics:
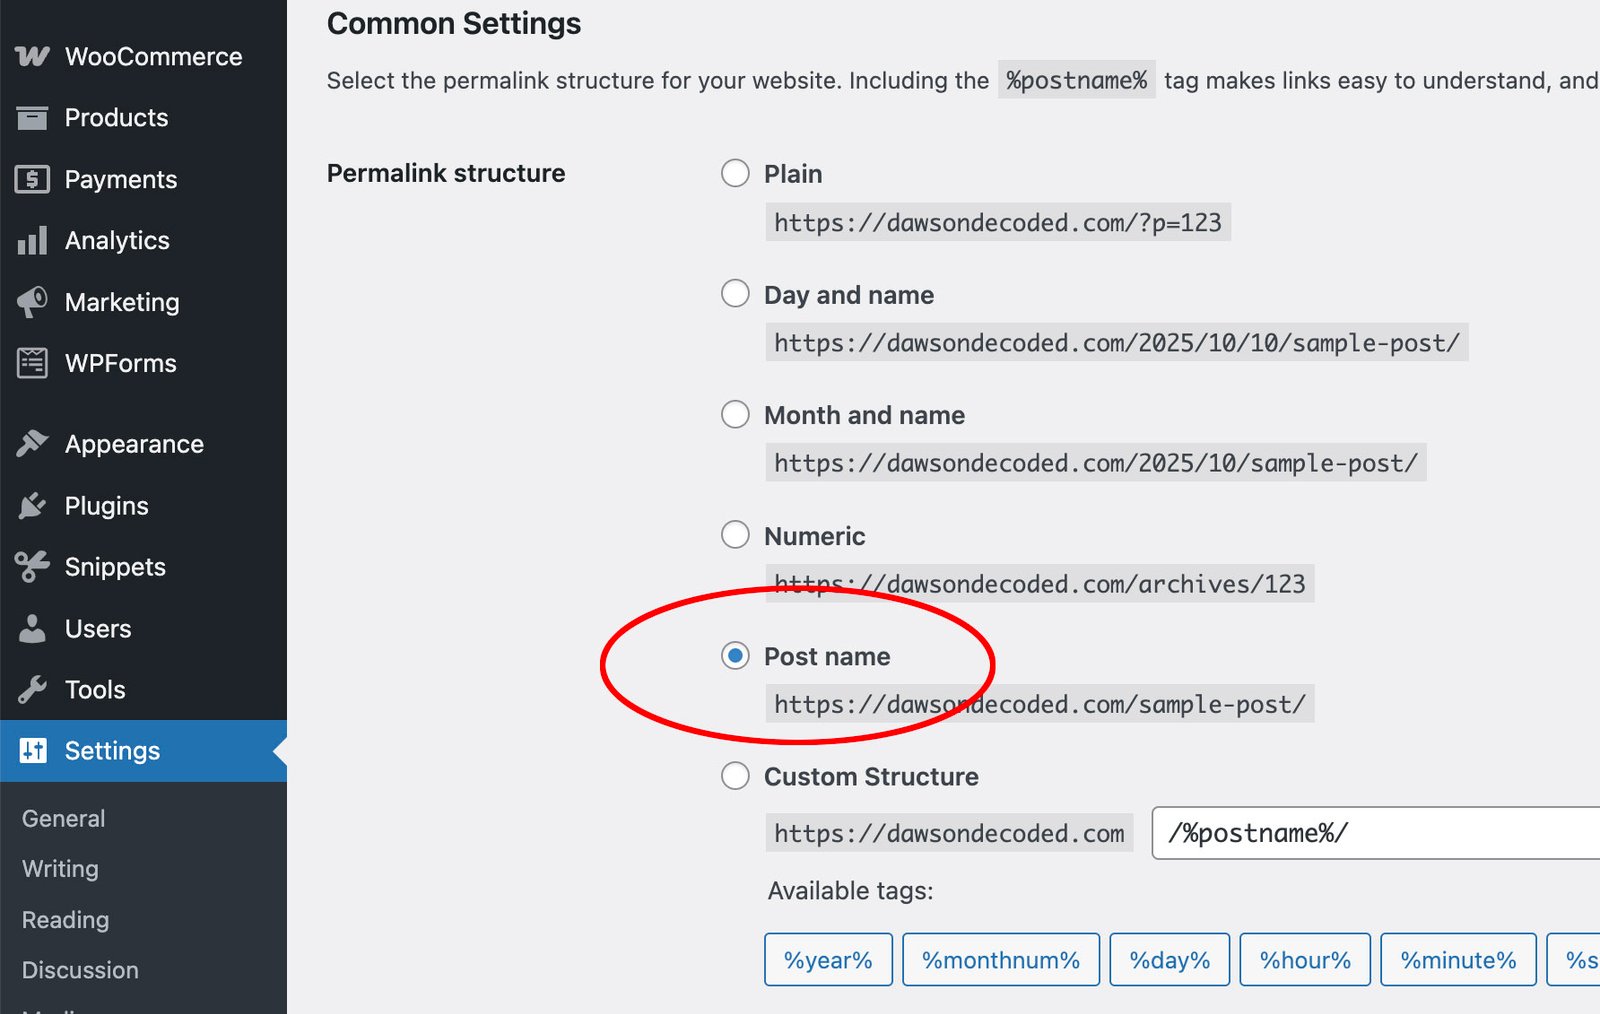
- Settings → Permalinks → Pick Post name for clean URLs.
- Settings → Reading: set your homepage to display “Your latest posts”. Later, when you’ve built a Home page layout, switch to “A static page”.
- Settings → General: set Site Title, Tagline, Timezone, Site Language.
- Settings → Reading: make sure Discourage search engines from indexing this site is unchecked before you launch.
Create your primary menu (Home, Blog, About, Contact):
- In Kadence: Appearance → Customize → Header → Primary Navigation, and in Appearance → Menus.
Keep the footer light: link to Privacy, Affiliate Disclosure, Contact, and add a short copyright line.
Comments (friendly but safe):
- WordPress Settings → Discussion: enable comments, tick “Comment author must have a previously approved comment”. Consider holding comments with 2+ links for moderation.
Performance:
- Use your host’s caching. On Hostinger, install LiteSpeed Cache (don’t stack multiple cache plugins).
- Images: export at sensible sizes (typically 1200–1600 px wide for blog images), and aim for ≤200–500 KB per image. Compress before upload (JPEG are smaller than PNG).
- Keep plugins lean: SEO, forms, security, and caching are enough to start.
That’s it. With permalinks, menus, comments, and caching set, you’ve covered the essentials.
Common beginner traps to avoid
- Add plugins only for a clear need, remove anything inactive, avoid stacking tools that do the same job (two caches, two SEOs, two image optimisers).
- Aggressive pop-ups: skip them early on, build trust first.
- Perfection paralysis: do not stall on the perfect logo or palette, publish first and iterate.
- Settings misses: make sure “Discourage search engines” is unchecked at launch.
- Backups and security: enable automatic backups, use strong passwords, avoid the default “admin” username, enable 2FA if available.
What’s next
In the last part, you will outline your first five posts, write the first one, and publish it with a simple promotion routine.
- Create and share content that builds trust (and your first readers).
Write posts that people actually want to read, then promote them the smart way to get your first 100 visitors.
🎧
Prefer to listen? This topic is also explored in one of my podcast episodes:
FAQ

Great to have you here! Feel free to leave your thoughts in the comments.
Hello, I’m John Dawson, a graphic designer (for a little while longer) and the writer behind DawsonDecoded, where I share hands-on insights on AI, blogging, social media, and whatever else crosses my mind.”
Get new posts by email when they’re worth sharing.
No spam.
More on blogging:
[smart_post_show id=”9385″]
More on blogging:
[smart_post_show id=”9386″]
You might like:
[smart_post_show id=”10235″]
You might like:
[smart_post_show id=”10237″]
Leave a Reply