
How to start a blog and find your first readers (part 2)
Archive Notice
This article was originally published on my former blog, DawsonDecoded, and is preserved here for historical reference. It reflects my views and approach at the time it was written. Any affiliate links that originally appeared in this article have been removed or disabled.
From idea to website: Hosting, domain, and WordPress setup
In Part 1 of this series, we looked at how to pick your blog’s topic and name. You’ve now got a solid idea of what you want to write about and what you’re going to call your blog.
Now comes the exciting part: getting your blog online.
This is where you take your idea from “just a name on paper” to an actual website framework: the foundation your future blog will be built on. It won’t be polished yet (that’s what we’ll cover in Part 3), but by the end of this page your blog will officially be set up and ready to customize.
In this article, I’ll walk you step-by-step through:
- What hosting and domains actually are (and why you need them)
- Which hosting service to choose
- Exactly how to set up your blog, from domain registration to installing WordPress
Let’s get started.

Hosting and domains
A blog isn’t just an idea. It’s made up of real files (your posts, images, design, settings). Those files need to live somewhere on the internet so anyone can find them. That’s where web hosting comes in.
Think of it like this:
Your blog is a house.
Your domain is the address. (the link people type in to visit, like “myawesomeblog.com”)
Hosting is the land where your house is built.
If you only have an address (domain) but no land (hosting), there’s nowhere for your house (blog) to stand. Visitors will type in your domain and see… nothing.
Hosting is what makes your blog real. It’s space on a special computer (called a server) that’s online 24/7. When someone types in your domain, the server delivers your blog to their screen.
That’s why hosting is an essential step. Without it, your blog simply doesn’t exist online.
Which hosting to choose?
There are many hosting companies out there, and at first, they all seem to offer the same thing. But the differences matter: speed, reliability, price, and how beginner-friendly the setup is.
For a brand-new blogger, you don’t need the fanciest or most expensive option. You need something that’s:
- Affordable (so you can start without a big upfront investment)
- Beginner-friendly (easy setup, clear dashboard, one-click WordPress install)
- Reliable (fast load times, good uptime, secure servers)
- All-in-one (domain, SSL, email, and backups included)
Some of the most popular hosting companies are Hostinger, Bluehost, SiteGround, HostGator, GoDaddy, DreamHost, WP Engine, Namecheap, and GreenGeeks. Out of these, I recommend starting with the one I use to host this site: Hostinger.
Hostinger consistently appears at the top of web hosting comparison guides (see the sources at the end of this post), thanks to its affordability and ease of use.
On top of that, independent real-world tests report excellent performance: for instance, over 99.98% uptime and fast loading speeds even under heavy traffic. And user reviews on platforms like Trustpilot average around 4.7 out of 5, noting particularly quick support and a smooth setup process.
Hostinger is trusted by 4+ million website owners with ratings of 4.7★ on Trustpilot, 4.8★ on Google, and 4.7★ on WPBeginner. It offers:
- Affordable pricing: Hosting starts at under $2.50/month if you choose a long-term plan. That’s cheaper than your weekly coffee.
- Free domain included: No need to buy your domain separately. You’ll get one free for your first year.
- Free SSL certificate: This little padlock symbol next to your URL makes your blog secure, and Google now expects it.
- Fast speeds: Hostinger runs on LiteSpeed servers and SSD/NVMe storage. Translation: your site loads quickly, which helps with both SEO and user experience.
- Easy dashboard (hPanel): Unlike clunky old-school cPanel, Hostinger’s hPanel is clean, beginner-friendly, and made for non-techies.
- One-click WordPress install: No coding, no fuss.
- Backups and email included: Weekly (and sometimes daily) backups are part of the plan, plus you can set up a free professional email like “hello@yourblog.com”.
- 30-day money-back guarantee: If you change your mind, no stress.
In short: Hostinger gives you everything you need to launch your blog today, without breaking the bank.
Ready to set up your blog?
Start your blog with Hostinger and get your domain name free for the first year.
Using this link [affiliate link disabled], you’ll also unlock an extra 20% discount, automatically applied at checkout.
Step-by-step: setting up your blog on Hostinger
Here’s how to set up your blog in about an hour:
Step 1: choose a plan
Head to Hostinger’s website and pick a plan. For most beginners, the Premium Web Hosting plan is perfect. It’s affordable, includes your free domain, and has more than enough resources to grow your first blog.
The Premium plan is one of the cheapest full-featured hosting options on the market, offering everything you need for just a couple of dollars a month (+ the extra 20% discount if you use this link [disabled]).
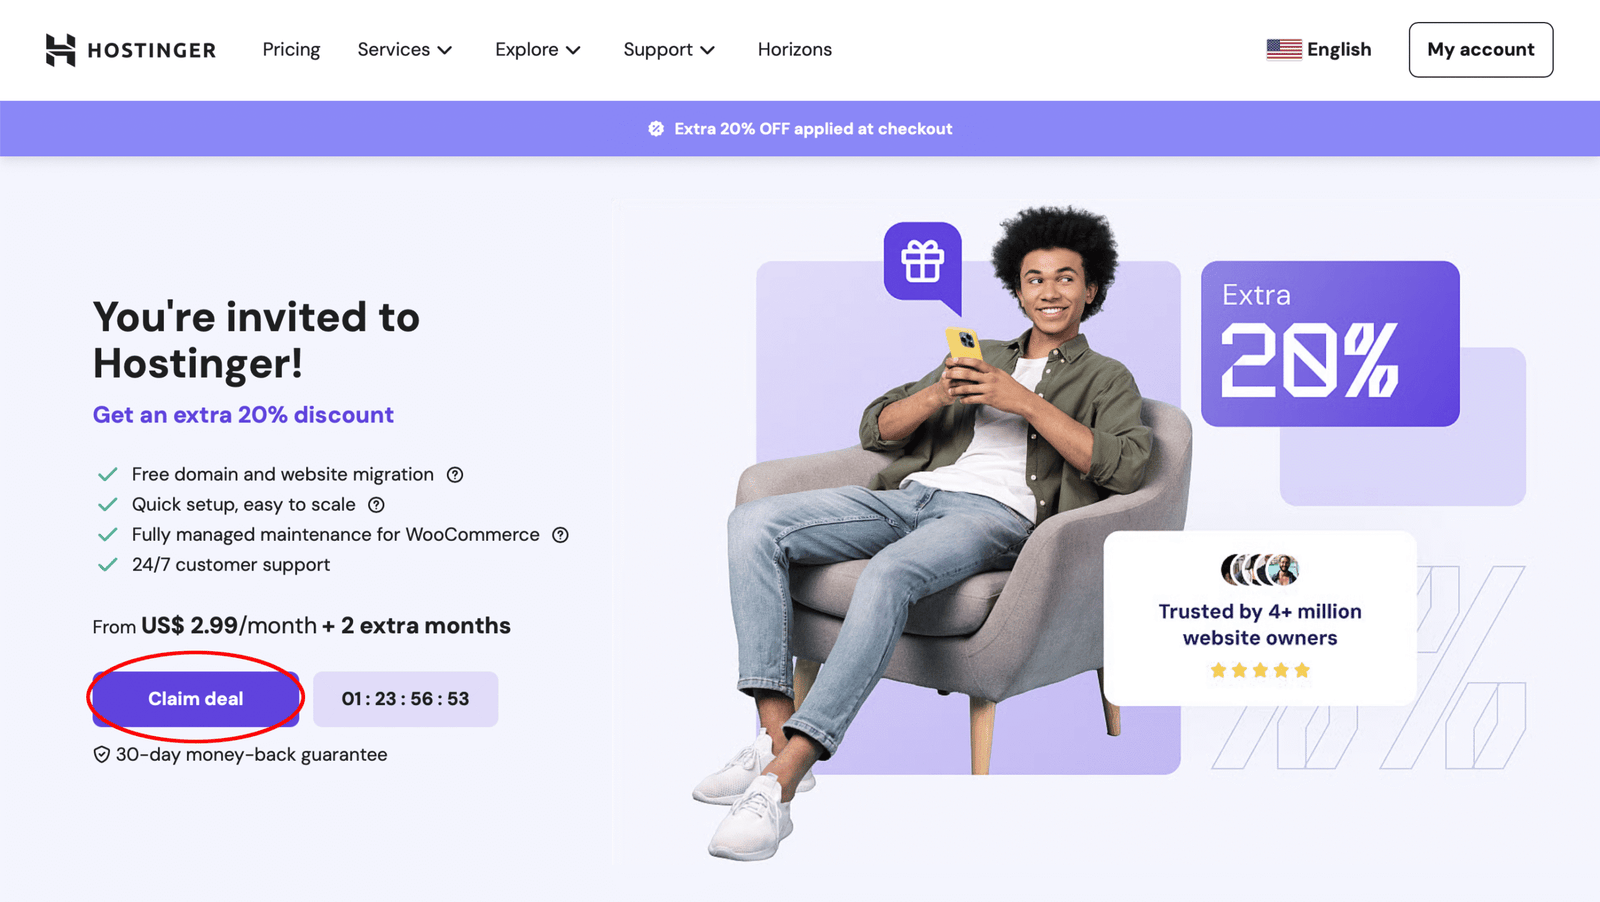
Clicking one of my links on this page will take you to this screen. Just hit “Claim deal” to unlock the extra 20% discount, which will be applied automatically at checkout.
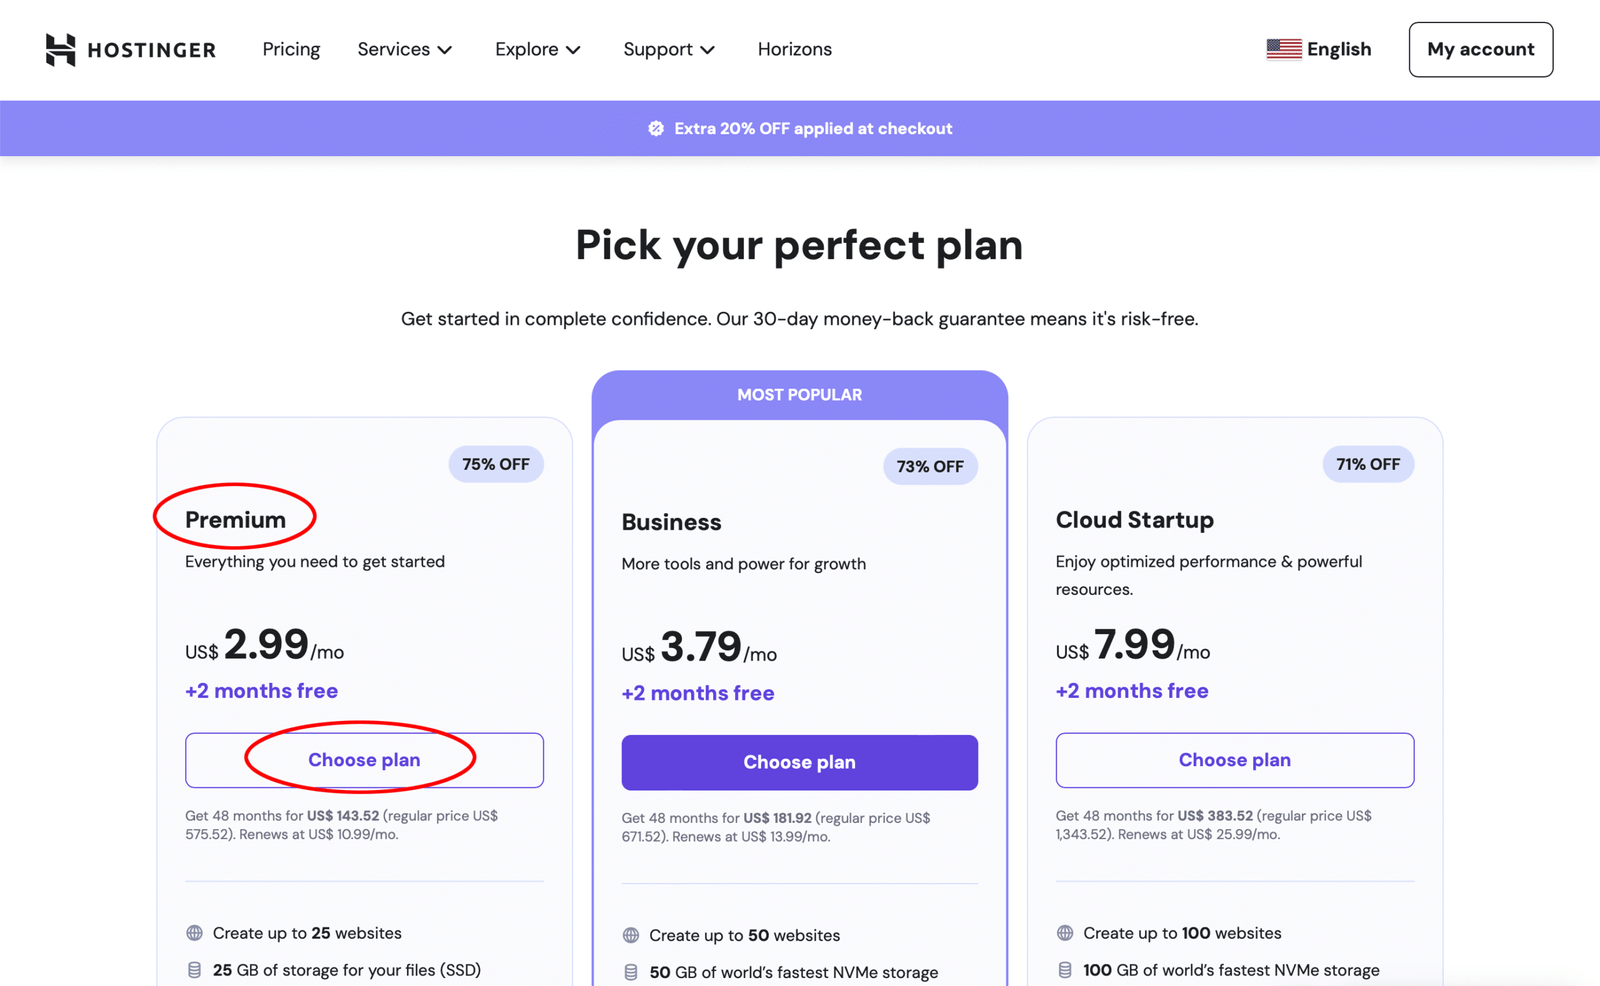
The Premium Web Hosting plan on the left is the best option for beginners. It includes everything you need to start a blog, and you can always upgrade later if your site grows.
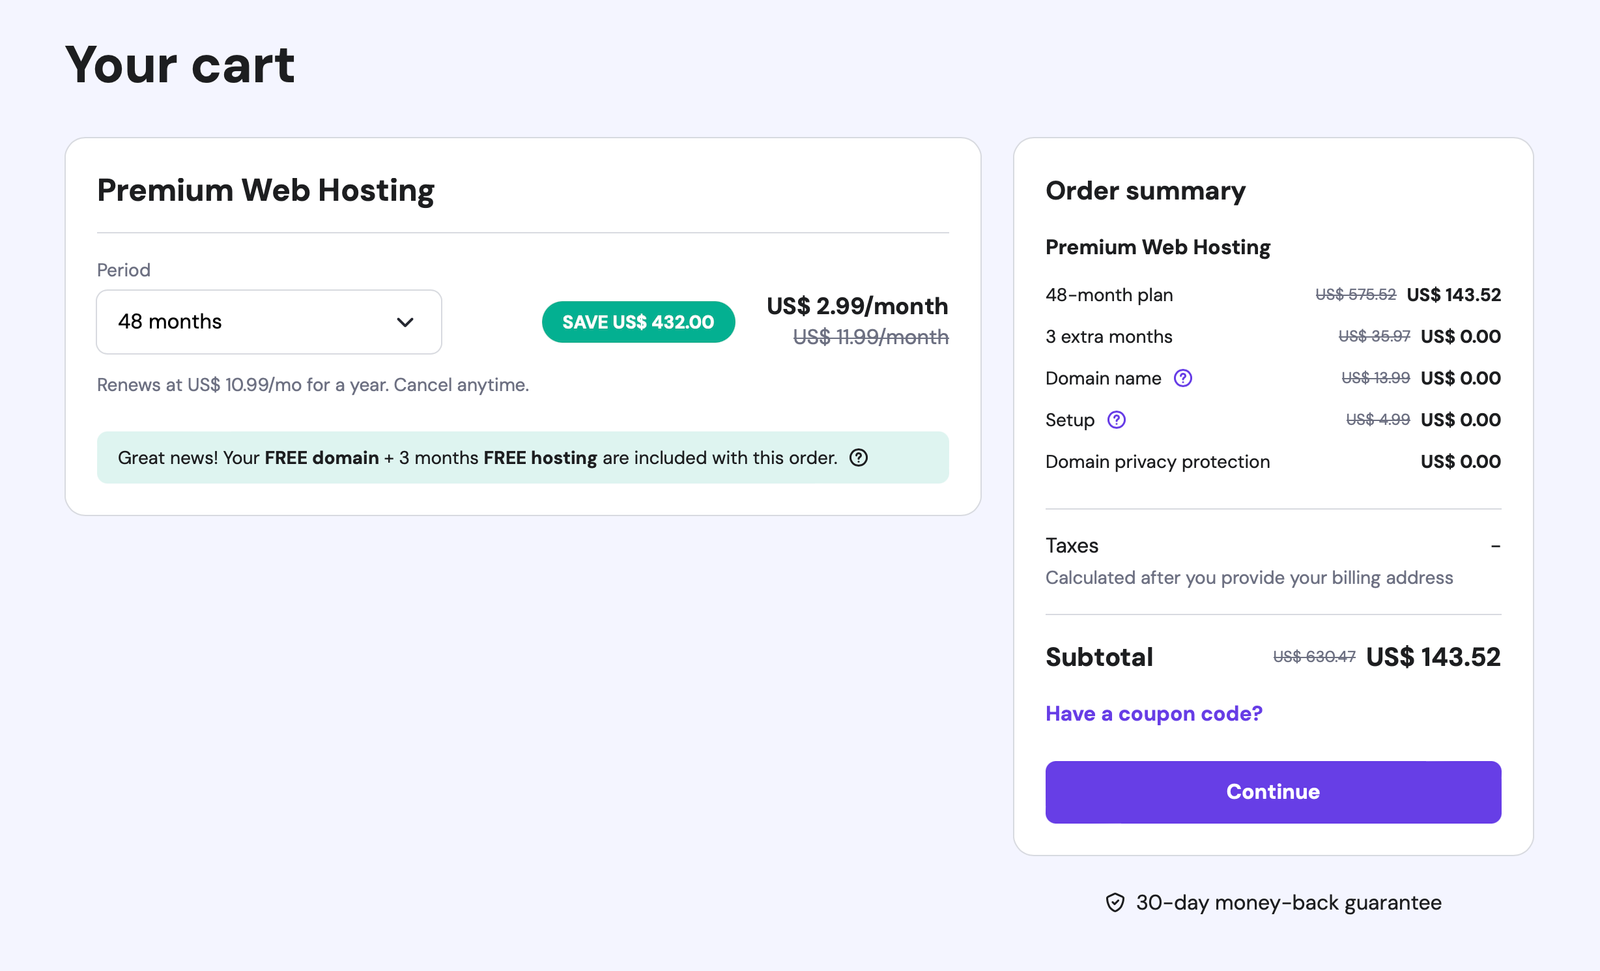
Once you’re in the cart, select the duration of your plan. The longer the term you choose, the cheaper your monthly cost will be. With the discount, the 48-month plan gives you the best overall value. Hostinger includes a 30-day money-back guarantee, so you can get started risk-free.
Step 2: register your domain
During signup, you’ll be prompted to choose your domain name. This is where you enter the name you decided on in Part 1 (e.g. “myblogname.com”).
If you haven’t read Part 1 yet, that’s where we looked into how to pick a strong domain name: what makes a good choice, what to avoid, and some easy brainstorming methods. You can find it here.
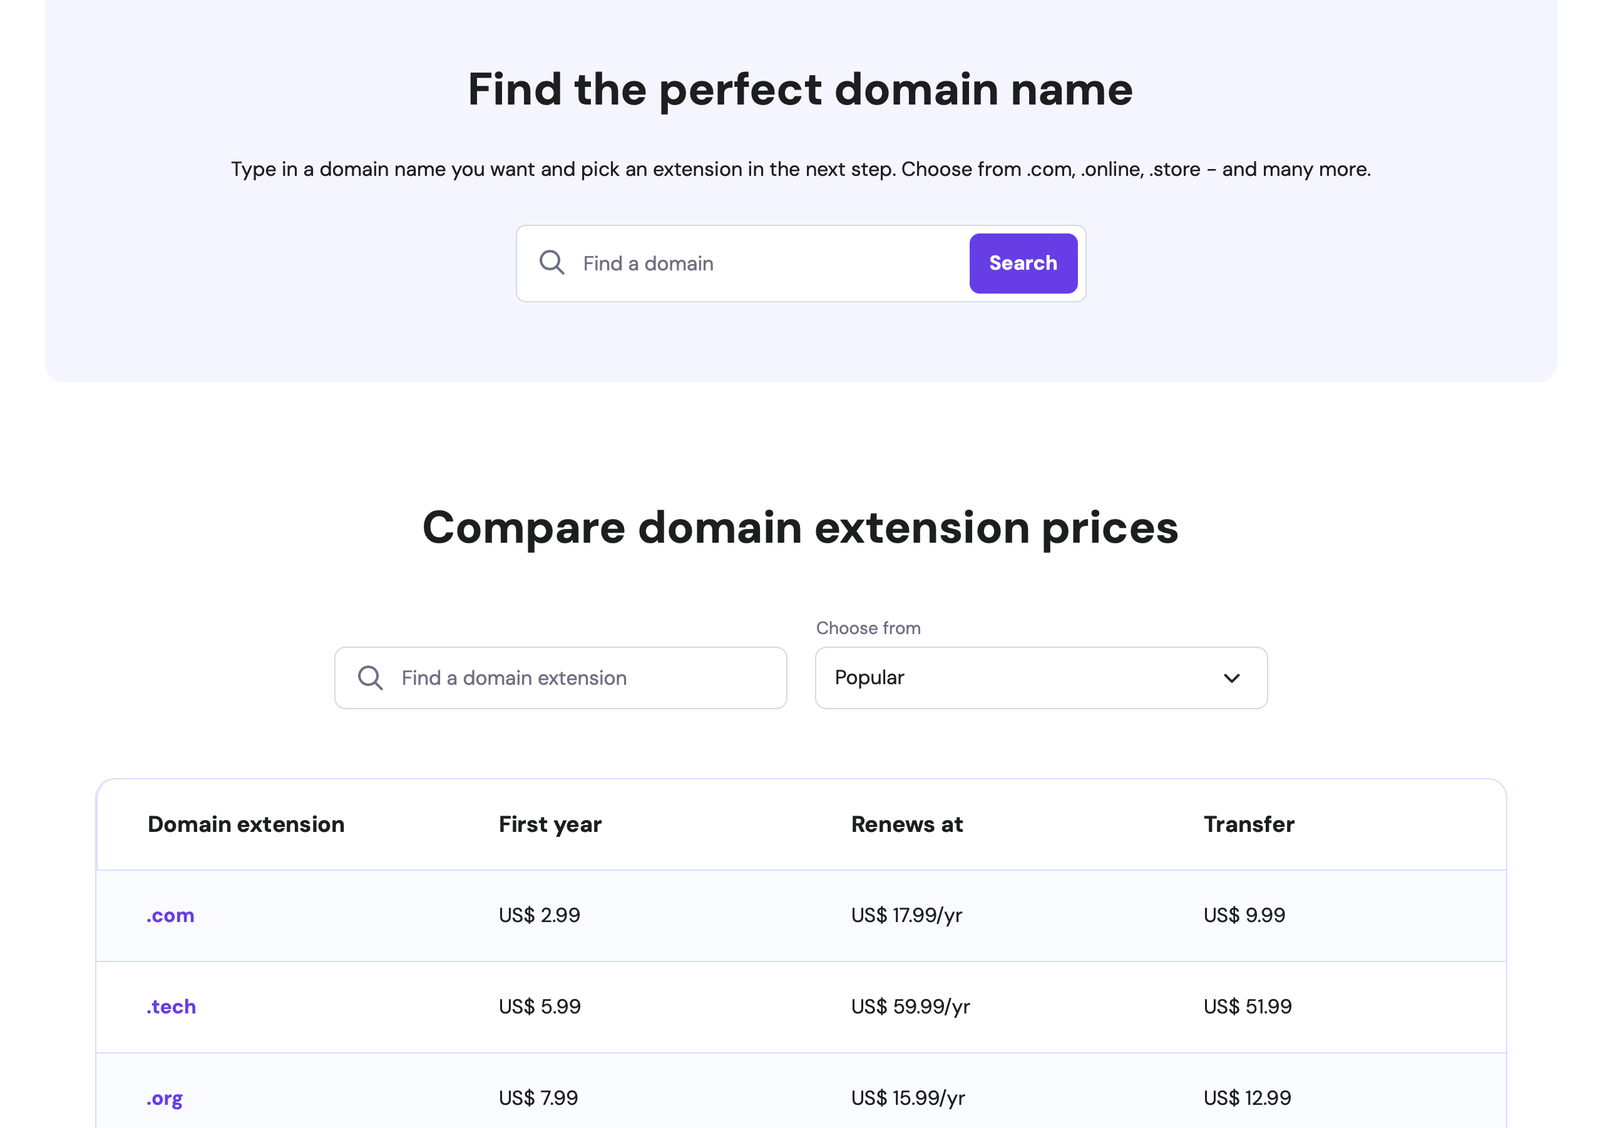
When choosing your domain name, use the search box to check availability and pick an extension (like .com, .org, or .tech). If your first choice isn’t available, try simple variations such as adding “the” or “blog.”
Step 3: create your account and checkout
Fill-in your details and complete payment. Don’t stress about extras like SEO toolkits or email marketing add-ons at checkout. You can always add those later. For now, just grab the hosting + domain.
Step 4: explore your hPanel
Once you’ve signed up, you’ll land in hPanel, Hostinger’s custom dashboard. This is your control center, where you’ll manage everything from hosting to domains, backups, and performance settings.
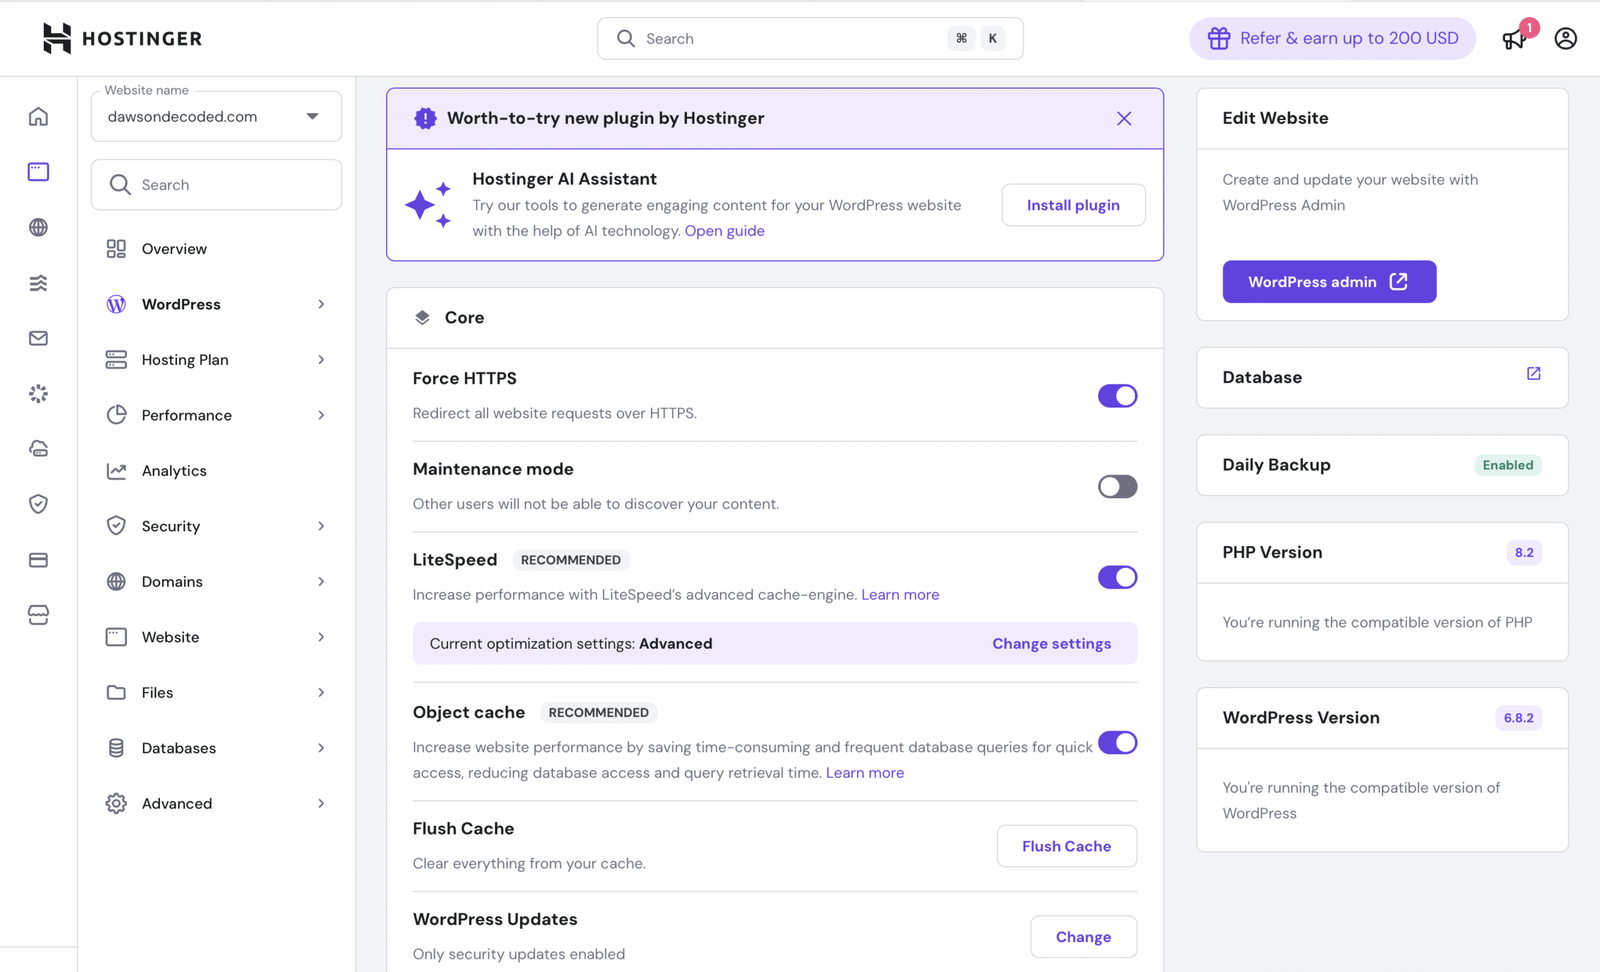
From here, you’ll install WordPress.
Step 5: install WordPress in one click
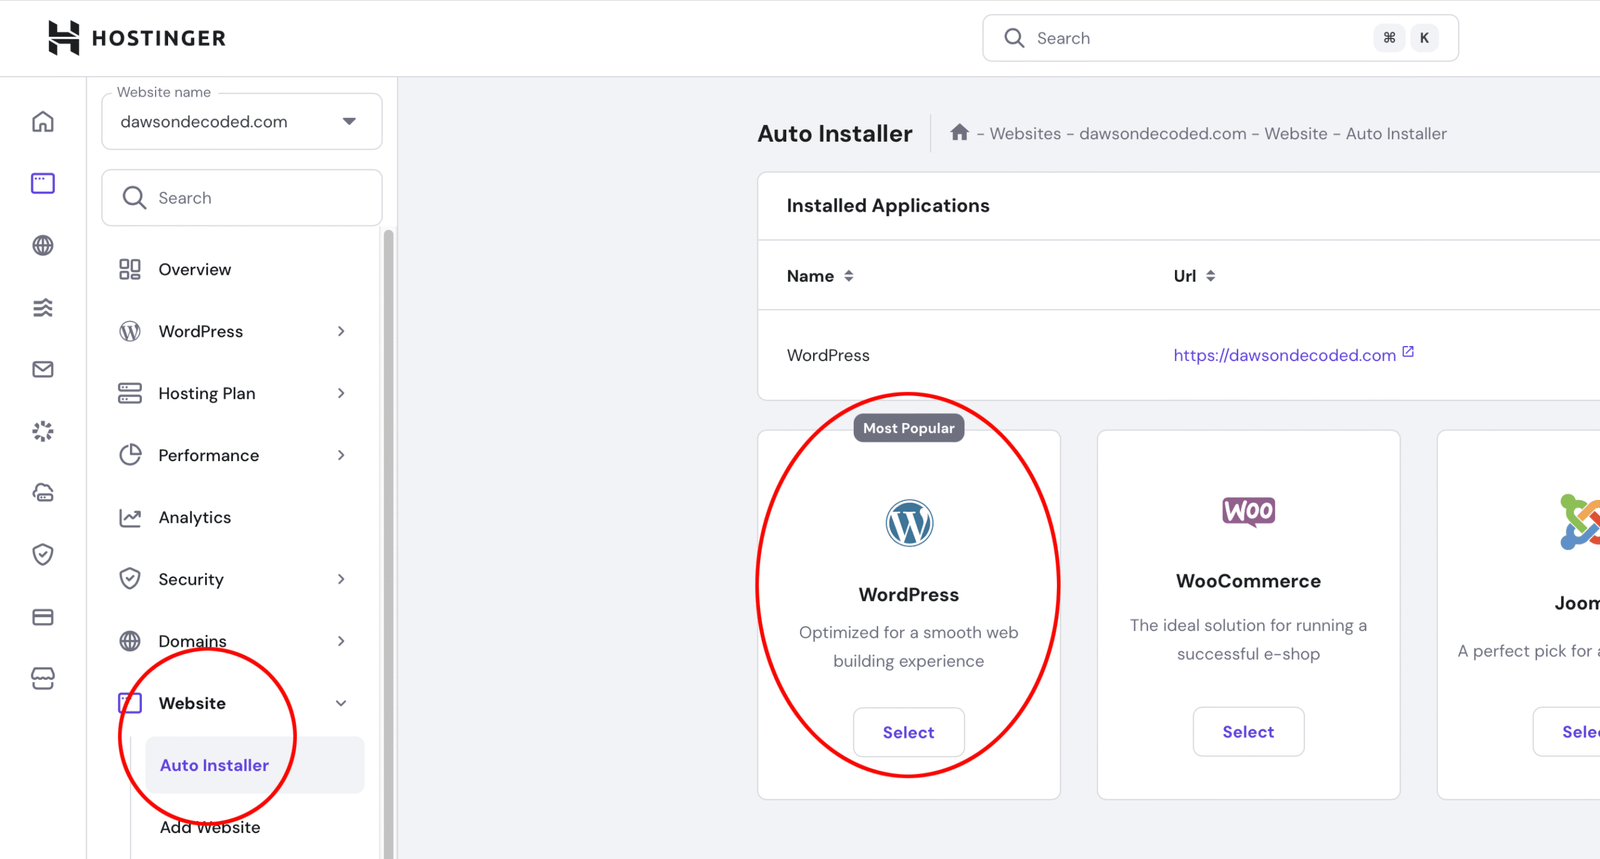
WordPress is the software that powers over 40% of all websites today. It’s flexible, customizable, and free. Hostinger makes it incredibly simple to install:
- In hPanel, click Website → Auto Installer → WordPress.
- Enter your blog name, email, and create a password.
- Click Install.
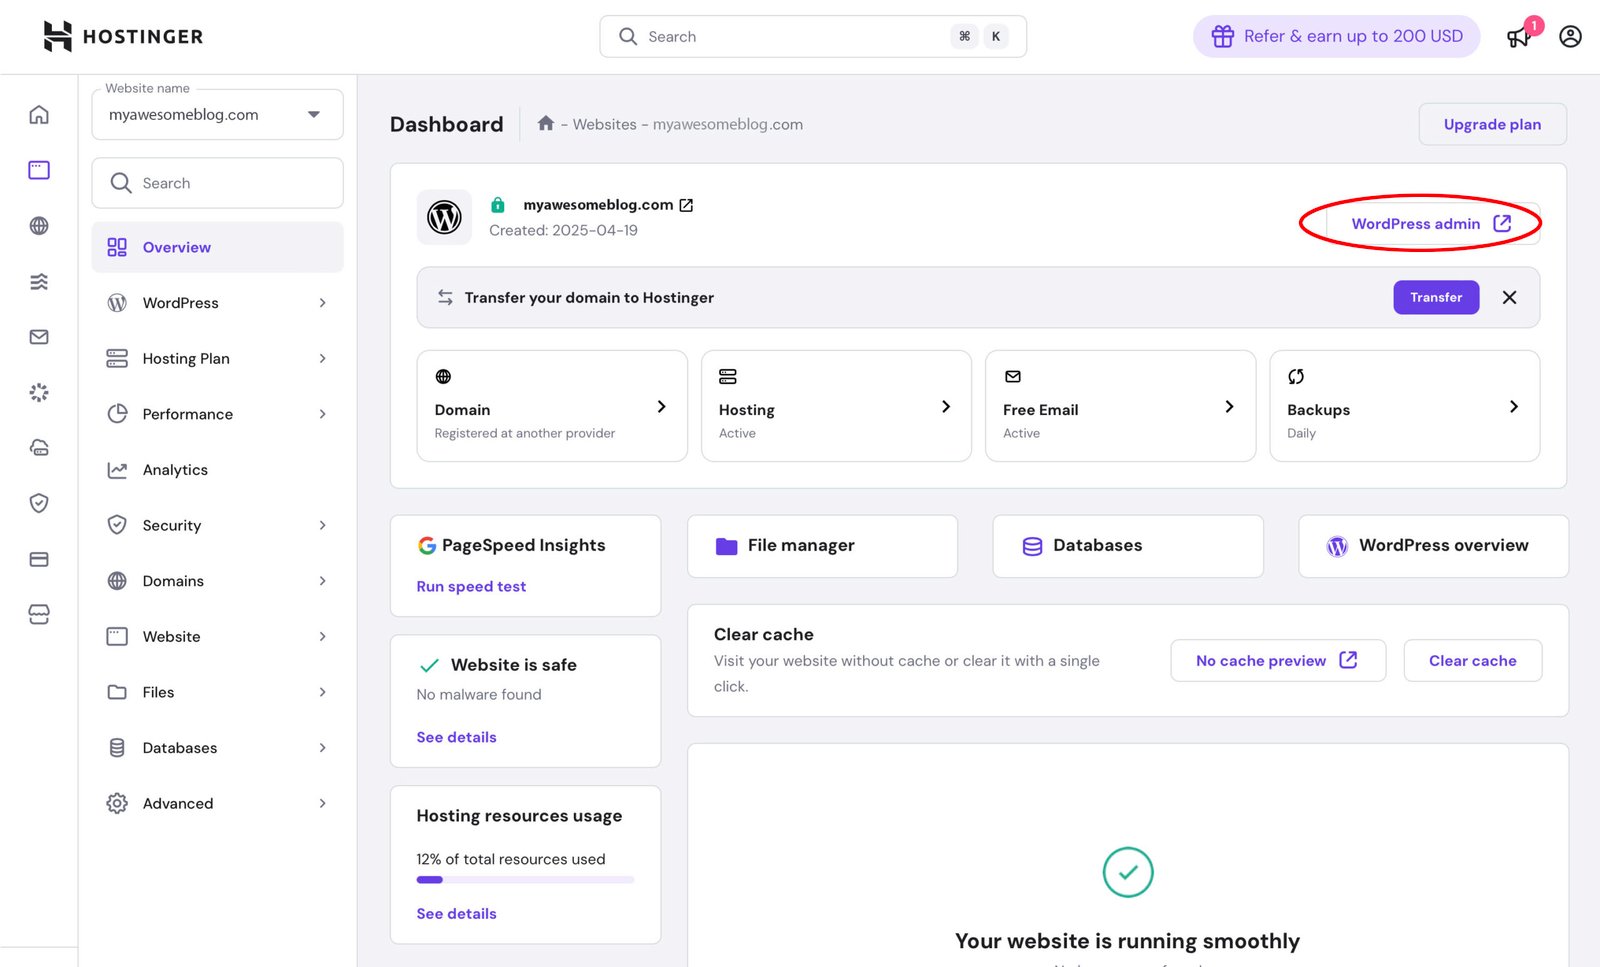
That’s it. In less than a minute, WordPress will be installed and your blog will start to take shape. You can now log in to your WordPress dashboard by typing “yourblog.com/wp-admin” into your browser, or by clicking the WordPress Admin button in your hPanel.”
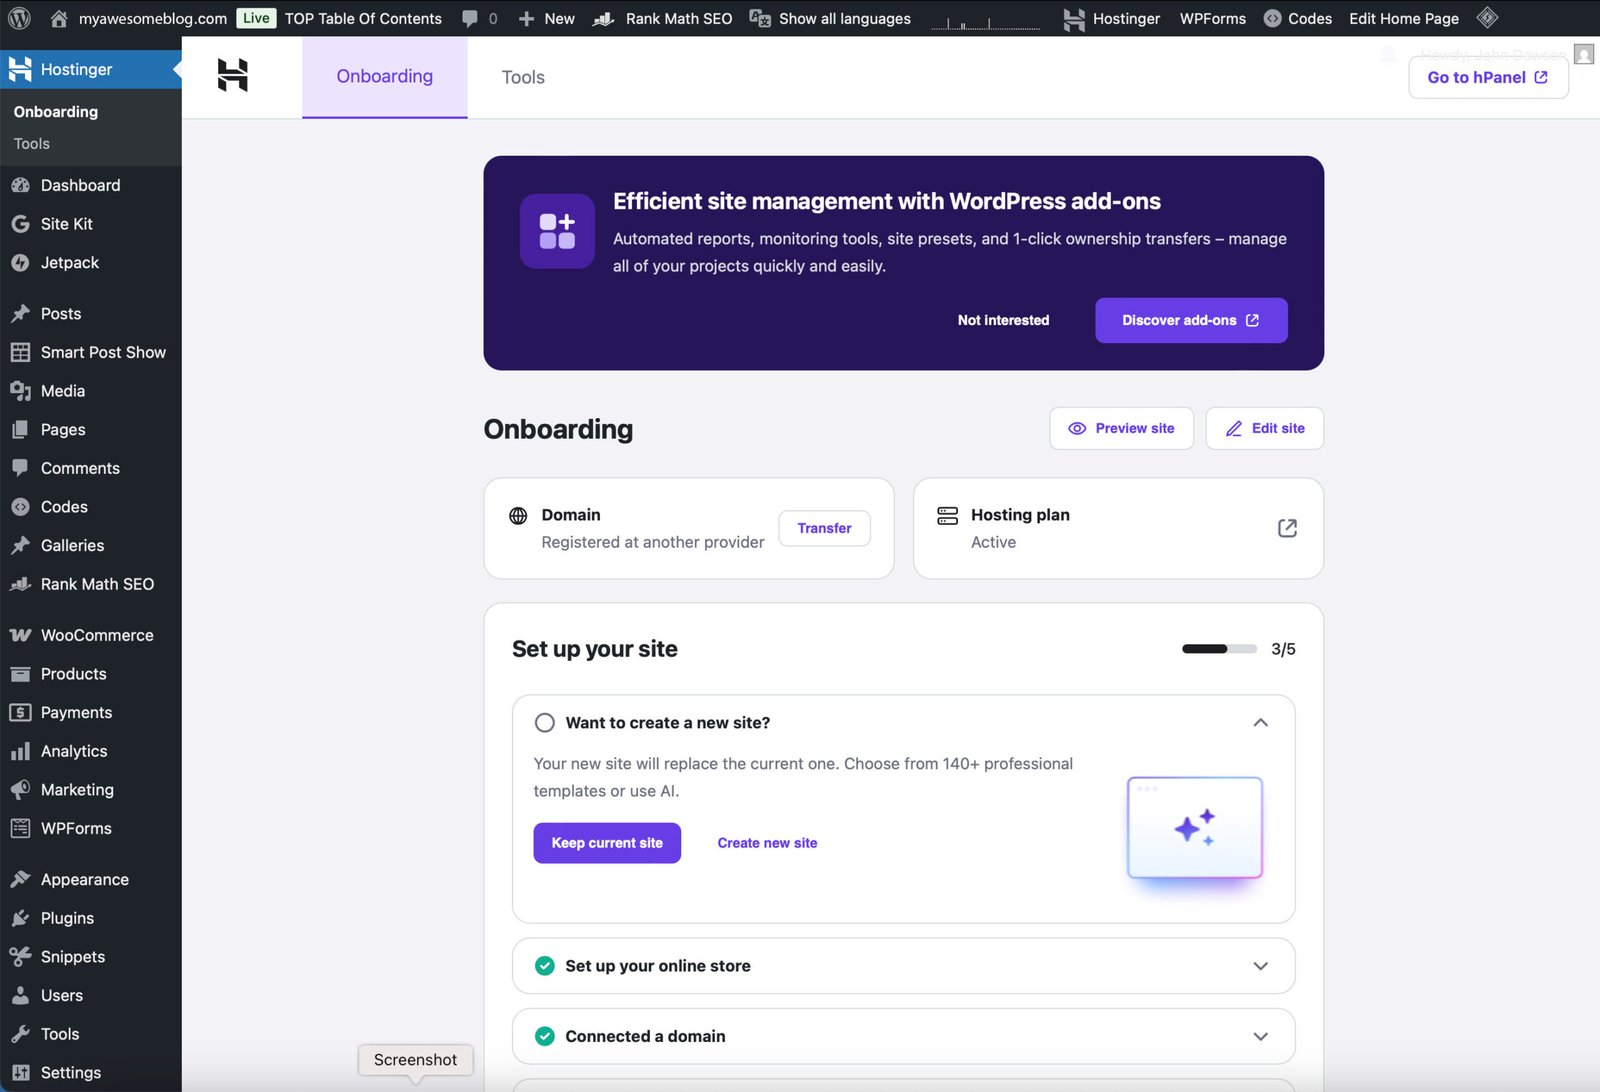
This is your WordPress dashboard: the “control room” of your blog. From here you’ll be able to write posts, create pages, install themes and plugins, and customize your site.
Take a moment to appreciate how far you’ve already come. In just a short time, you’ve chosen and registered a domain name of your own, secured hosting with one of the world’s leading providers, and successfully installed WordPress. What was once just an idea on paper has now become something tangible: the foundations of your blog are in place, and it’s beginning to take shape.
What’s next
In the next part of this series (in part 3/5), we’ll design your blog, choose a theme, and add the must-have pages so it looks professional and ready to share:
- Make it look and feel professional: themes and must-have pages.
Choose a clean, beginner-friendly theme and add the essential pages that make your blog look trustworthy.
This next post will be followed by:
- Create and share content that builds trust (and your first readers).
Write posts that people actually want to read, then promote them the smart way to get your first 100 visitors.
🎧
Prefer to listen? This topic is also explored in one of my podcast episodes:
FAQ: getting your blog online with hosting and WordPress

Great to have you here! Feel free to leave your thoughts in the comments.
Hello, I’m John Dawson, a graphic designer (for a little while longer) and the writer behind DawsonDecoded, where I share hands-on insights on AI, blogging, social media, and whatever else crosses my mind.”
Get new posts by email when they’re worth sharing.
No spam.
More on blogging:
[smart_post_show id=”9385″]
More on blogging:
[smart_post_show id=”9386″]
You might like:
[smart_post_show id=”10235″]
You might like:
[smart_post_show id=”10237″]
Leave a Reply